Always looking for ways to save money when I garden and I know there are many other gardeners out there trying to do the same. Here's a list of my own ideas and links to other websites I have found that have saved me considerable money.
The Herb Ladder
I saw a magazine article where a an old wooden ladder was used for flower pots for visual interest in the garden. I figured, what a perfect way for me to gain vertical space on my front porch for my herbs! I got a wooden ladder for free from someone giving it away on www.freecycle.org. You could search Craigslist, too. I bought the plastic rectangular planters from the dollar store. As soon as I installed it on my front porch, I began getting compliments from all the neighbors. Since I picked up 2 ladders, I am considering painting one a fun color for the garden in the backyard. The one on the front porch seems to look good the way it is....it's rustic/shabby looks seems to go really well with the herbs.
To hold the planters steady so they don't blow over in the wind or get accidentally knocked off, I wound wire or twine around the planters under the rims and tied to the ladder edges on each side. (Please ignore the porch floor. It's on the "To Do" list for repainting-lol!)
Potatoes Grown in Black Garbage Cans
I have a rain barrel that I forgot to empty for the winter, so the sub-zeros temps were not kind to my make shift rain barrel made out of a plastic black garbage can. It was left with a crack in the bottom. Not wanting to let go of it just yet, I tried to think of a good use of a clean, "broken" black garbage can. Hmmmm....potatoes like the dark to grow....and my need to grow vertically when I can, I decided to turn it into a strawberry barrel on the bottom and potato planter on top.
At your own risk! Please be careful..
Cut semi-circles all around the sides of the garbage can up to about 3/4 of the way to the top randomly on all sides, like an upside down U. Do not cut off the flap. This will hep hold the plants and soil in. Fill with potting soil and plant strawberry plants in the "holes" as you go up. Plant potato seedlings in the top and add soil as they grow to promote more tubers to grow. Strawberries and potatoes happen to be good companion plants. I am quite happy with the results and may consider buying more garbage cans just for this purpose next year!
The Dog Food Bag Strawberry Planters: by Derwanna Hurst
Materials:
One large dog food bag made from tarp-like material (I use Purina DogChow)
alternative:burlap sack, two ply landscaping fabric
Sewing machine & thread
twine, rope, or clothes line for hanging
soil
strawberry plants, of course
Directions: Once dog food bag is empty, turn it wrong side out and wash with soap and water, let dry.
Cut once in half down middle from top to bottom. Turn right side out.
Sew each side so that you are left with a long tube closed at one end. Turn wrong side out so that you have a solid color, not the printed side.
Fold open end down to inside of bag, about 2-4 inches.
Cut X's in random place on one side of the bag. The other side will be against a fence so no plants go there.
Fill with soil and plant the strawberries in the X holes. Not too many X's, though, you don't want to compromise the strength of the bag. Takes some patience to keep the soil from coming out while putting in the plants.
Hang two long loops of twine from the fence and seat the planter in them like a sling. I place one loop on the bottom right corner and one around the bottom left.
Next, tie a length of twine around the top of the planter and around the fence to secure the top.
Hanging the planters this way worked best for me but there may be better ways to hang it depending on your circumstances. You could also sew the top in a cuff and insert some wire from wire hanger that you have fashioned into a circle and then attach a loop of wire like a basket and hang it from a pot hanger, but this gives you the basics and feel free to change it to suit you. I also used the planters for lettuce and bush beans.
This was the first one I made. I think it looks cleaner when you fold the top to the inside so you can't tell its humble origins, like the one below...
These are photos from the fall. Next Spring I'll take more so you can see how well they work....
Wood Pallet Raised Bed:
Materials: 7 wood pallets-heat treated NOT fumigated
landscaping fabric
staples/staple gun
soil
Directions: Find wood pallets for free behind grocery stores, etc. Attach wood pallets together by using one wood pallet as your "scrap pallet" and taking pieces of it to connect the other six together from the inside. You are making a bottomless rectangle with two pallets on each side and one pallet at each end. Cover entire inside with landscaping fabric and secure it with staples. Fill with soil and plant. For the outside of the container, you can plant herbs and/or lettuce in between the slats. I will post a pic once this is completed, along with step by step photos to better explain.
Latest note: Sometime after I posted this idea, I began seeing this idea all over the internet. You would probably be better off following instructions already out there....why try to re-invent the wheel, right? LOL
Wheel Barrow Planter
Materials: Old wheelbarrow
drill
newspapers
soil
seeds or plants
When we bought our house, it came with an old slightly rusted wheel barrow that had a flat tire. Already owning a much nicer once, I decided to make a planter out of it. Hubby drilled some holes in the bottom for drainage. Layer the bottom with newspaper so the soil doesn't get lost through the drainage holes and fill with soil. Add plants or seeds and that's all there is to it! Looks really charming....
2/7/12:
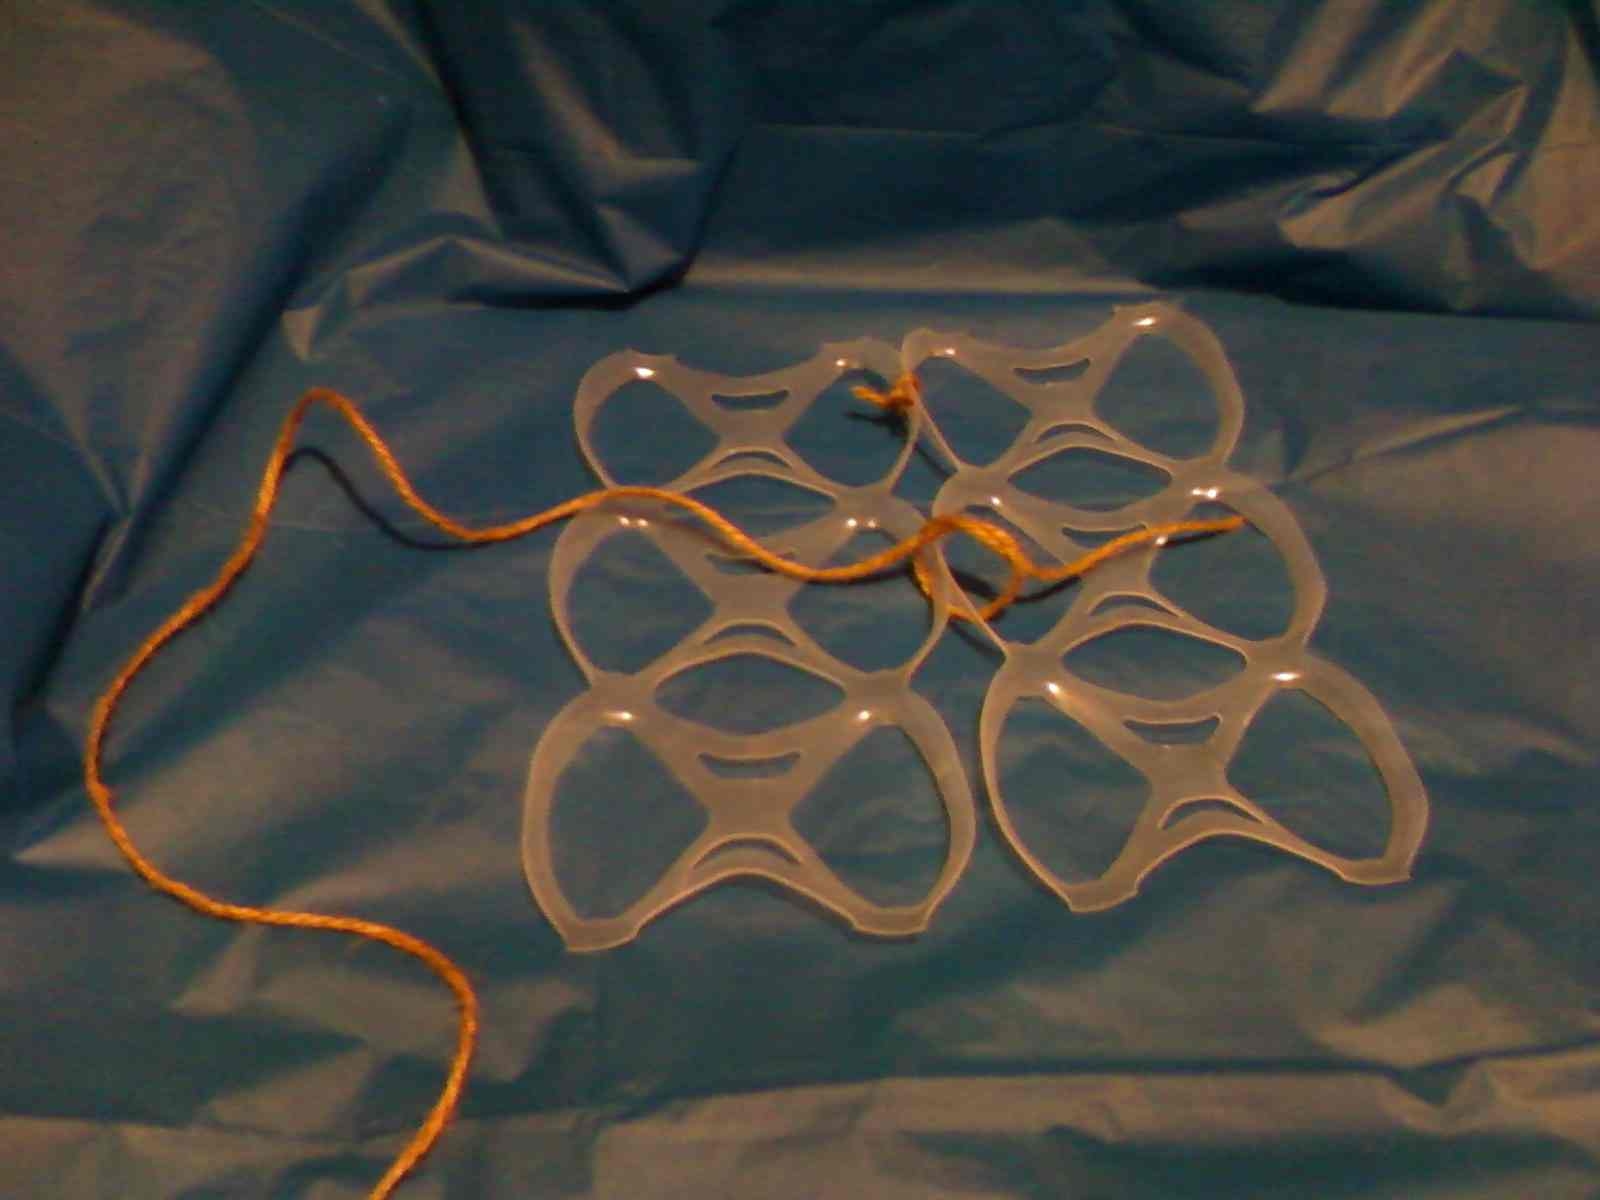
Trellis from Recycled 6 Pack Soda or Beer Plastic Rings
So after the Superbowl this past Sunday, I saw a pile of these rings from our party and was thinking...Wow, what a shame for all these to go to the landfill and tried to think of a way to reuse them, when I came upon one of my gardening catalogs and saw the usual net trellis and thought...hey..wait a minute! I can make a trellis by connecting all those six pack rings together! So, here it is......I'll let you know how well it works (or does not work) in the garden this year, or you can try it for yourself...
Step 1: Place two rings together and double or triple knot cotton string, jute twine, yarn or fishing line at each of the three rings side by side. Continue doing this until you have it the height you want the trellis to be.
Step 2: Keep adding rows until you get it the width you want.
Tips: Jute twine will decay after about a season out in the garden so you'll have to redo the knots next year....but hey ...I am a use-what-you-have kind of girl. Fishing line would probably look the neatest in appearance but you may have to experiment on how to best keep it knotted as I have had some come undone on other projects.
You could recycle that old sweater with the unrepairable hole in it by unraveling it and using the yarn.
Don't drink enough of either to get you the size trellis you want? Ask coworkers, friends, neighbors, or relatives to save them for you until you have enough.
Keep in mind that this plastic does stretch...I am sure we've all tried to break one of these before with our hands and you've seen how it stretches with force. I would suggest starting with peas, beans, or cucumbers to see how it holds up first. Pumpkins may be too heavy for it..or at least you'd have to allow for the stretch. But hey...the materials were free and it only cost you some time....
Seed Starting 3/4/14
Every year, about this time, I start a marathon of seeds indoors in my basement. My goal, as usual, it to see how little I can get away with spending and obtain the results I want.
Lights & shelving indoors:
I purchased fluorescent lights for about $12 each at Home Depot. They are the kind that have two bulbs, plug in, and hang from chains. I hang them with twine or fishing line to extend the short chain so that it reaches from an inch or two above my plants all the way up to the wooden beams in the ceiling of my basement. These hang over an old kitchen counter top that was repurposed from a kitchen remodel. I did the same thing in a basement closet but attached the twine suspending the lights to the undersides of a shelving unit my husband made out of salvaged 2x4s. You might also want to check on www.freecycle.org. I have seen fluorescent lights given away for free.
* Quick tip: If you can't afford much, just buy one or two a year until you have enough for the full counter. I plug mine into a power strip so I can just flip the switch, instead of unplugging everything all the time.
flats:
I have a huge assortment of different flats all about the same size. Some do not have drainage holes. I bought these cheaply from KMart. They are black plastic and cost a little over $1.00. I have obtained a huge amount of flats for free by asking the store manager of grocery stores, etc. that sell plants out on shelves. Usually, if people just buy a few plants out of a flat at a time, at some point, the store is left with an empty flat. I saw an employee stacking these under the shelves and asked if I could have them. They were just going to throw them away. I walked away with a stack so tall I had to carry them away in a cart. You can also use those large buffet style aluminum pans. I ask people at work after parties to save the ones that just held water or had something easy to clean, like salad, in it. They all know I repurpose eveything I can for my garden, anyway.
seedling pots:
I am sure you have read somewhere about some of these, but I will include all that I can think of so that anyone new to gardening will not miss out on any oldies but goodies.
1. paper pots made from recycled newspaper or paper sacks
2. toilet paper or paper towel empty cardboard roll
3. yogurt, Italian ice, or any other plastic container-wash thoroughly and at your own risk, poke holes for drainage. Save to use over and over again
4. Soda or milk jugs with tops cut off. Needs drainage holes.
5. Waxed cardboard half gallon cartons from OJ or milk cut from top to bottom so you have two long little "boats".
6. Recycled plant pots from last years seedlings. I even ask neighbors for theirs if they are throwing them out.
Seed starting soil:
My favorite is coir. One little brick fills as much pots as a large bag of soil once you add the water to it.. The only downside is that they dry out faster, in my experience. The bricks sell for about $5.00 right now, so that is usually my most expensive cost to seed starting.
Seeds:
I save mine every year, so these are at no cost to me. I do splurge a little and buy some new varieties just for fun.
You can get free seeds on some websites for seed exchanges. There are always people wanting to give to those just starting out. Just google Free seeds or Seed Exchange. www.gardenweb.com has a forum for seed exchange where I have seen people giving away seed for free.
You can also chat up the gardener you know best. Most are generous people to a fault. If they find out you are interested in getting a garden going, they may offer their extras.
You can see my light hanging setup and my hodge podge of seed flats and containers:
Upcoming Project ideas:
Hanging Basket Wall of Herbs on porch -vertical gardening.
Strawberries in pallets- spread control, experiment vertical.